| |||||||||||
PiEM - the different π-Energy-MonitorWelcome to the PiEM - a smart energy monitor based on the Raspberry Pi and REBOL. You can purchase an officially licensed bundle of the "PiEM-It!" management software at a price of €24.99 EUR only here. The software bundle already includes all necessary modules (web server, meter, archive & plot) of the managment software, which are required for an energy monitor for smart metering based on the Raspberry Pi.
The software runs on all Raspberry Pi models. The modular concept of the "PiEM-It!" management software is ideally suited for the new multi-core architecture of the Raspberry Pi 2/3 and uses the additional computing power optimally.
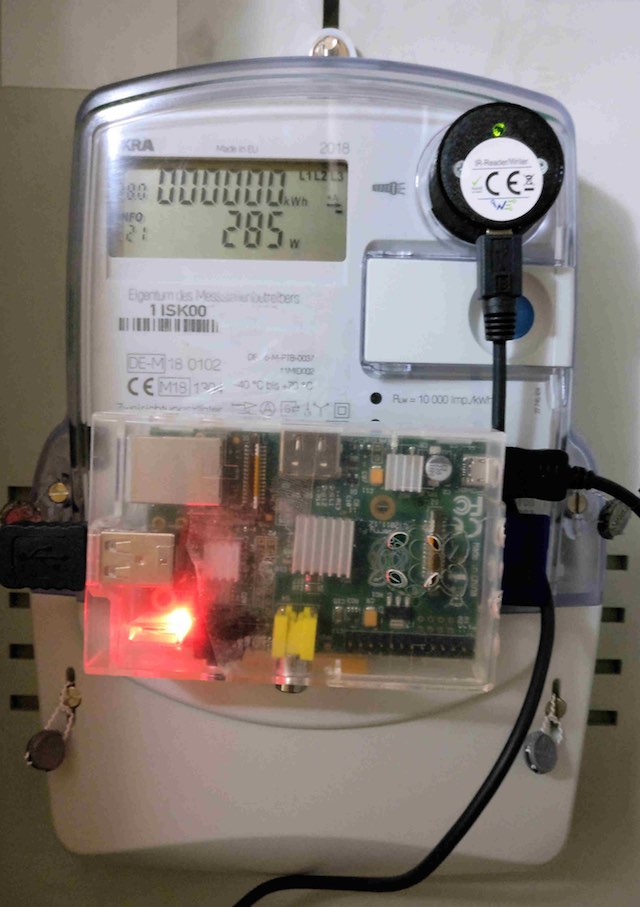
Please refer to the release notes to get an overview and information on the latest version of the software. The hardware that is shown on the following photos are only for illustration and example as a PiEM can look like and how it is assembled. Please purchase the required hardware from the respective manufacturers or through their distribution channels. TGD-Consulting offers only IT services and software solutions. You want to make your own PiEM based on our "PiEM-It!" management software? Then purchase a license and read on to find out ... As a quick start you'll get here directly an answer to the most frequently asked questions:More answers to questions can be found in the FAQ. The term PiEM stands for π-Energy-Monitor and represents the extension of an ordinary Raspberry Pi to an intelligent smart home solution. PiEM is versatile and works according to the initial configuration at start-autonomous. By connecting suitable sensors to the Raspberry Pi, smart metering in nearly real-time takes place even with conventional Ferraris electricity meters as well as with normal consumption meters for gas and water. PiEM is excellent also for the monitoring and graphical display of feeds in energy networks. In contrast to most smart home offers of major energy suppliers the π-Energy-Monitor works without any cloud services. The integration of PiEM into existing infrastructures, such as local home networks, is therefore simple and straightforward. All data collected and processed with the help of PiEM are stored only locally and always remain at home under your own control. All important functions of PiEM are controlled and monitored even from afar when needed by using a browser from any PC, tablet or smartphone. Find out live the ease of use and advantages of the π-Energy-Monitor and convince yourself right here and now on the Internet from the "PiEM-It!" management software, its simple operation and the extensive configuration options. Here you see a The system price of PiEM including all required components is between 100,- and 200,- EUR and depends on the number of sensors used. That figure already includes the cost for the license of the "PiEM-It!" management software. The version of the PiEM shown on this page consists of the following components:
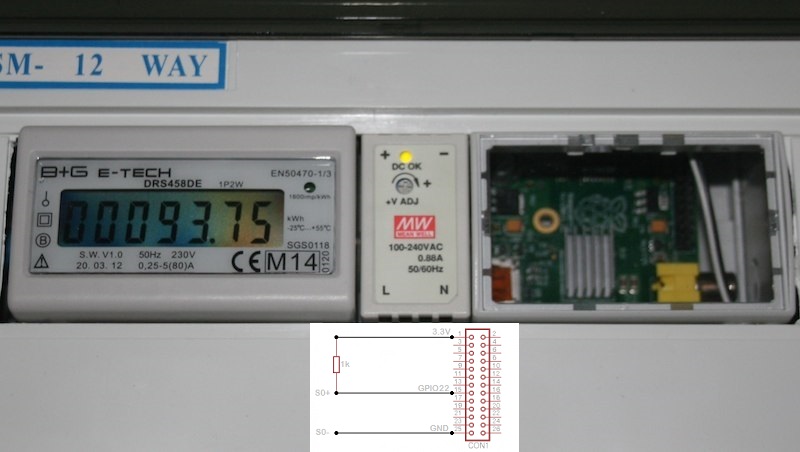
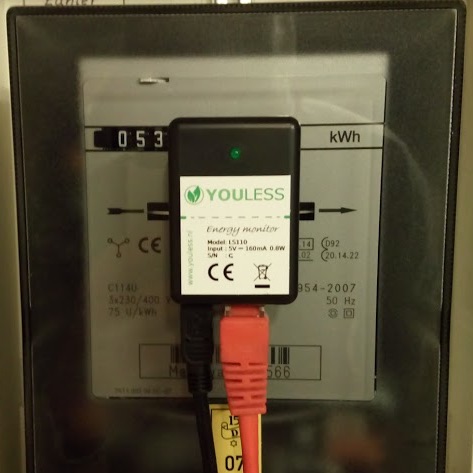
The external appearance of above PiEM prototype can hardly be distinguished from an ordinary Raspberry Pi. Each component of the PiEM can be single-handedly assembled by any ambitious users with a little skill. All parts can be ordered directly from the Internet. The sources of supply are partly linked in the above lists. We are using a Raspberry Pi Model A for our prototype of the PiEM, which is extended by a sensor for Ferraris electricity meters and a reed sensor for gas meters. In addition, conventional meter with S0 interface If the Raspberry Pi can not be placed near the meter, it is recommended to connect the sensors via an arbitrary n-wire cable to the Raspberry Pi as needed. Thus larger distances between sensors and Raspberry Pi can be bridged. If the cable quality is right, this works for lengths up to 20m without any problems. The pins of the sensors are directly connected to the 5 volt or 3.3 volt supply voltage and to the GPIO interface of the P1 pin header of the Raspberry Pi. For reed sensors a sufficiently large series resistor is limiting the current and provides the necessary level adjustment at the GPIO input. If a counting pulse is applied to the reed contact, this will also visually indicated by a LED. The exact wiring of the reed sensor can be obtained from the diagram shown below. Caution: If you get unexpected system hangers during operation, this indicates a too weak power supply for the Raspberry Pi. Then replace the PSU with a stronger and more reliable one. When mounting the components into the case short circuiting must be avoided. While installing the sensors to the P1 pin header pay careful attention, that no unwanted connections to live lines arise. This may damage your Raspberry Pi. In particular during the installation of the Raspberry Pi and especially in dealing with the sensors is to ensure that appropriate protective measures against static discharges are taken. The central core of a PiEM is the "PiEM-It!" management software, which in addition to a Web server module also includes an Archive & Plot module as well as the Meter module. With the help of the latter PiEM-It! detects all measured data nearly in real-time. Measuring the signals from the sensors is in principle quite simple and is based on the detection of pulses. If a sensor detects an optical or magnetic count pulse, this pulse is transformed to a digital signal and converted into a high signal at the associated GPIO input. The detection and evaluation of the signals at the GPIOs is done by a REBOL3 script, the Meter module. It calculates the current count and the respective consumption and stores both values in the corresponding log file of the sensor. Using the Archive & Plot module PiEM-It! is archiving all measured data and prepares them for graphing as a plot. These plots are automatically drawn every night shortly before midnight and provided as resources for the web server pages. The clearly arranged daily, weekly, monthly and annual charts (see above) can be increased by clicking. Apart from these "historic" charts the plots for the current measurement data are dynamically generated by the Web server module. The Meter module is Donationware and under this basic condition available as open source. The remaining modules of the management software are closed-source and require the purchase of a license. The operation of PiEM-It! done easily via a standard web browser. The web server module handles the entire communication and control. A integrated search function enables not only simple and fast search for historical readings and the selection and focus on certain periods of time in order to analyze them more closely. It also provides an additional status function ("... a nice gimmick ..."), which among other things records the temperature of the SOC of the Raspberry Pi for the last 10 hours and represents it as a temperature profile. Just click at the corresponding π at the bottom of the page and find out how warm it is about inside the PiEM. Note: By factory default the configuration interface (PiEM-Settings) is only reachable within the same network segment as the PiEM. If necessary, this can be adjusted according to your own security requirements. If no address for the Admin IP nor an IP range is specified, the π-Energy-Monitor is configurably from any IP address! Optionally, you can set the access control by an individual combination of user and password. Use the following link to purchase a license of "PiEM-It!" and to acquire the software itself. The license for the software bundle already includes the limited, nonexclusive right to use the respective modules. An additional license fee for each module is not necessary anymore. Nevertheless when needed you can also purchase volume licensing of our software in addition to individual licenses for the respective modules ( Archive & Plot / Web server ). Detailed information on prices or volume discounts for volume licensing are available upon request. Installation & Start: It's an amazingly simple setup. The software is delivered as a tarball, which only has to be unpacked (tar xvf PiEMIt.tar) and PiEM-It! is ready for use on the Raspberry Pi. By manually calling the shell script ./PiEMIt.sh start all PiEM-It! modules on the Raspberry Pi are started. Of course, this script can also be used as an init script to start PiEM-It! automatically within the booting process of the system. But you can even run individually the PiEM-It! modules as an alternative to the shell script. By entering ./bin/r3 PiEMIt.r & in the shell the Archive & Plot-module as well as the Meter-module are started. The launch of the web server module is provided by this command ./bin/r3 Webserver.r & . However, we recommend at least the integration of the web server module as respawn process in the /etc/inittab . This offers the advantage that the web server module restarts each time it has been killed. Usage: As already mentioned above, the continued use and configuration of the PiEM-It! management software is amazingly simple. It is primarily done by using the browser on pc, tablets or smartphones. Simply enter the IP address of the Raspberry Pi in conjunction with the port of the web server module as an URL in the browser ( eg: http://192.168.0.100:8080 ) and go for it. Everything else is self-explanatory or reveals itself by itself. We hope you are just as convinced of the benefits of PiEM and from the smart design of the software as we do. If you have any questions, requests or suggestions for improving PiEM or the "PiEM-It!" management software, we are looking forward to your inquiry. You want to know more about our projects and other software? Then visit also these sites: | |||||||||||
- Copyright 2014-2020 by TGD-Consulting - FAQ - PiEM powered by Serve-It! TNG - |